If you’re looking for a rainy-day activity that’s equal parts easy, cute, and genuinely fun, you just found your new favorite craft. These paper octopuses are so adorable that you’ll want to make a whole ocean of them – and trust me, once your kids see those curly little tentacles come to life, they won’t want to stop either.
The best part? Everything you need is probably already sitting in your craft drawer right now.
Whether you’re a seasoned craft mom or someone who hasn’t touched a pair of scissors since elementary school, this step-by-step guide has you covered. We’ll walk you through every single step – from cutting the paper to curling those iconic tentacles – so you and your little ones can sail through this project with zero stress and maximum fun.
Let’s dive in!

Why You’ll Absolutely Love This Paper Octopus Craft
Before we get into the how-to, let’s talk about why this craft is such a winner – because it really is one of those rare projects that checks every single box.
It’s genuinely simple. No advanced origami. No confusing folds. Just cut, roll, curl, and glue. If your child can hold a pencil, they can help with most of this project.
It’s wildly customizable. Want a pink octopus? A rainbow one? A tiny ocean family in every color of the rainbow? Go for it. The craft is totally flexible, and that creative freedom is half the magic.
It sneaks in real learning. Fine motor skills, color recognition, following instructions, spatial reasoning – this little craft quietly builds big skills while your kids are just having fun.
It makes an amazing keepsake. These are genuinely display-worthy. Pop one on a shelf, use them as a centerpiece for an under-the-sea birthday party, or let the kids gift them to grandma. She will absolutely love it.
It’s practically free. A few sheets of cardstock and some craft glue. That’s it.

What You’ll Need
Gather these supplies before you sit down with the kids – having everything ready means uninterrupted crafting (and less chance of someone wandering off mid-tentacle).
Colored cardstock or construction paper (blue, pink, or any color your kids love – one full sheet per octopus)
White cardstock or thick paper (for the eyes)
Black cardstock or paper (for the eye pupils)
Scissors
A white or light-colored marker or gel pen
Craft glue or a glue stick
A pencil or marker for drawing
A cylindrical object to shape the body (a small cup, a tube, or your hands)
Optional but fun: googly eyes instead of hand-cut ones, glitter glue for extra sparkle, or washi tape for a patterned body.
Pro Tip: Cardstock works much better than regular printer paper for this project. It holds its shape beautifully, especially for the tentacles. If you only have regular paper, that’s okay – just know the tentacles may be a little floppy.

How to Make a Paper Octopus – Step-by-Step Instructions
Step 1: Cut the Tentacles
Start with one full sheet of colored cardstock. Hold the paper in landscape orientation (wider than it is tall).
Using your scissors, cut strips from the bottom edge of the paper upward – but stop about 2 to 2.5 inches from the top edge. This uncut section at the top will become the body of your octopus, so don’t cut all the way through!
Make your strips roughly equal width – about half an inch to three-quarters of an inch each. The more strips you cut, the more tentacles your octopus will have. Aim for 8 tentacles to stay true to octopus anatomy, but honestly, more is more when it comes to adorable crafts.
Take your time with this step. Uneven strips are totally fine and give each octopus its own personality.

Step 2: Draw the Suction Cup Details
This is where your octopus goes from “cute paper tube” to “absolutely irresistible sea creature.”
Before you roll the paper up, lay it flat and use your white or light-colored marker to draw small oval or circular shapes along each tentacle strip. These are the octopus’s suction cups!
You don’t need to be perfectly precise – rough little ovals in a row down each strip look totally charming. Space them a few millimeters apart and run them down most of the length of each tentacle.
Let the marker dry for a moment before moving on so nothing smears.
Pro Tip: Let your kids draw their own suction cups on their octopus. Even if they go rogue with the shapes, it adds personality and makes the final craft feel truly theirs.

Step 3: Roll the Body Into a Cylinder
Now take the uncut top section of the paper (the part you left intact at the top) and gently roll it into a cylinder shape.
The cylinder doesn’t need to be super tight – a loose-ish tube works beautifully and gives the octopus a chubby, round body shape that is extremely cute. Think toilet-paper-roll width, roughly.
Apply glue along the inside edge of the paper and press to hold the cylinder closed. Hold it for a few seconds until it sets. If you’re using a glue stick, use a generous amount and give it time – this is the structural base of your octopus, so you want it to hold well.
Once glued, the tentacle strips should be hanging freely downward from the bottom of the cylinder.

Step 4: Curl the Tentacles
Here comes the most satisfying part of the whole project – and your kids are going to LOVE it.
Take each tentacle strip one at a time and wrap it around a pencil, marker, or your finger. Hold it in place for a second or two, then release. The strip should spring into a beautiful little curl.
Repeat for every tentacle. You can curl them all the same direction for a neat look, or alternate them for a more playful, wild octopus vibe.
If a curl springs open too much, just wrap it tighter and hold it a little longer. The paper has a memory – it’ll hold the shape once it’s been persuaded.
Fun Variation: Curl some tentacles tighter than others for a more dynamic, lively look – like your octopus is mid-swim!

Step 5: Make and Attach the Eyes
Cut two large circles from white cardstock – these are the whites of the eyes. A coin or bottle cap makes a great tracing guide if you want both eyes to match.
Then cut two smaller circles from black cardstock – these are the pupils. Glue one black circle onto the center of each white circle.
Position the eyes on the upper front of the cylinder body and glue them on. Press firmly and hold for a few seconds.
Want to add extra expression? Draw a tiny curved mouth with your marker below the eyes. Just a small “U” shape is enough to give your octopus a sweet, happy smile.
Pro Tip: Place the eyes slightly off-center or at slightly different heights for a goofier, more loveable expression. A perfectly symmetrical face is cute – a slightly lopsided one is hilarious.

Step 6: Add Any Final Details
Take a step back and look at your octopus. Now’s the time to add any finishing touches!
You can draw a little smile or “O” shaped mouth under the eyes. Some crafters like to add small dots on the body to mimic the suction cup pattern. Others draw tiny eyelashes for a more feminine look.
If you want to get fancy, add a strip of glitter glue along the edge of the body cylinder, or draw little bubbles around the octopus to make it look like it’s swimming underwater.
This is your octopus – make it personal.
Step 7: Let It Dry and Display!
Give everything a few minutes to dry completely before handling too much. Once dry, your paper octopus is ready to show off.
Stand it upright on its curled tentacles – it should balance beautifully on the curls, which act like little feet. Place it on a shelf, a windowsill, or in the center of a table for an instant conversation starter.
Tips for Crafting With Kids of Different Ages
This craft is wonderfully adaptable depending on how old your little helpers are. Here’s how to tailor the experience for maximum success and minimum meltdown.
Ages 3–5 (Toddlers & Preschoolers)
Let grown-ups handle the cutting and the rolling step. Your little one’s job? Drawing the suction cups and curling the tentacles! Toddlers absolutely love the tentacle-curling step – hand them a pencil and watch them go to town.
Keep it simple. Don’t stress about neat lines. The wonkier, the better.

Ages 6–9 (Early Elementary)
Kids this age can handle most steps with light supervision. They can do their own cutting (safety scissors work fine with cardstock), draw their details, and do the rolling with a little guidance on applying glue.
Let them pick their own colors and take full creative ownership. The pride on their faces when it’s done is worth every dropped scissor and smudge of glue.
Ages 10 and Up (Older Kids & Tweens)
Older kids can complete this project almost entirely independently. Challenge them to make a whole family of octopuses in different sizes, colors, and expressions. You can even turn it into a friendly competition: whose octopus has the best curls? Whose has the funniest face?
They might pretend they’re too cool for it. They are not. They will love it.
Creative Variations to Try
Once you’ve nailed the basic paper octopus, the fun doesn’t have to stop. Here are some ways to level up the project for different occasions and ages.
Under-the-Sea Birthday Party Centerpiece
Make a whole collection of octopuses in various shades of blue, teal, purple, and coral. Group them together on a table with some blue crinkle paper or tissue paper “waves” underneath. Instant ocean scene – and zero expensive decorations required.

Rainbow Octopus Family
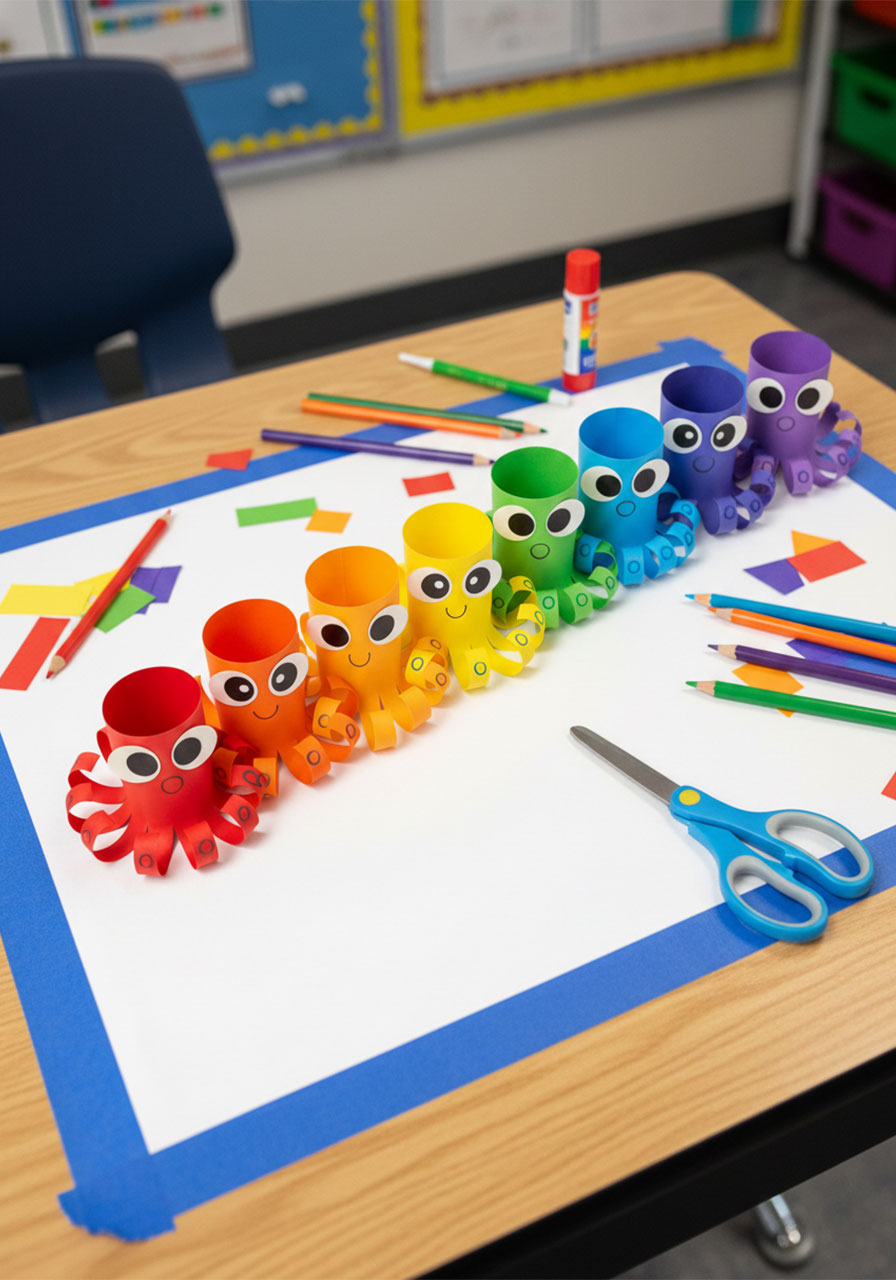
Make seven octopuses in ROYGBIV order and line them up for a rainbow ocean effect. This is a gorgeous display for a kid’s bedroom and doubles as a color-learning activity for younger children.

Personalized Gift Tags
Make a mini version using a half-sheet of cardstock and attach it to a gift. Write the recipient’s name on the octopus body. It’s the most adorable gift tag you’ve ever seen, and it doubles as a bonus gift on its own.
Ocean-Themed Classroom Craft
This makes an incredible classroom or homeschool activity. Every child’s octopus will look totally different, which is part of the joy. Display them all on a bulletin board “underwater scene” with cut-paper seaweed and fish and you’ve got yourself a wall installation worthy of an art gallery.
Glow-in-the-Dark Octopus
Use glow-in-the-dark paint or marker for the suction cup dots and the eye pupils. In the dark, your octopus will have an ethereal, deep-sea glow that kids absolutely go wild for.
Frequently Asked Questions
What kind of paper works best for this craft?
Cardstock is the clear winner here. It’s sturdy enough to hold the cylinder shape and thick enough to curl nicely without going limp. Construction paper is a great second choice. Regular printer paper technically works, but the tentacles will be much floppier and the body cylinder won’t hold its shape as well.
How long does this craft take?
Plan for about 20–30 minutes per octopus once you get the hang of it. The first one always takes a little longer as you figure out the steps. By the third one, you’ll be flying.
My tentacles won’t curl – what am I doing wrong?
Nothing! Some paper just takes a bit more convincing. Try wrapping the strip more tightly around a thinner object (a pen or chopstick works great) and holding it for a full 5–10 seconds before releasing. If the paper is very thick, you can also run each strip gently over the edge of a table to soften it slightly before curling.
Can I use glue sticks instead of craft glue?
Yes, but use a generous amount and press firmly. Craft glue (like Elmer’s) gives a stronger hold and is more forgiving. If you have a low-temp hot glue gun and older kids, that’s actually the fastest and most secure option – just supervise carefully.
Can we paint the octopus instead of using colored paper?
Absolutely! Start with white cardstock, complete all the cutting steps, then paint before rolling. Watercolor gives a beautiful, dreamy ocean effect. Acrylic paint gives bolder, richer color. Let it dry completely before rolling and gluing.

Why Crafting Together Is Good for You AND Your Kids
Here’s the thing about crafts like this – they’re not just a time-filler. They’re genuinely good for you.
When you sit down with your kids and make something together, you’re building memories. You’re also modeling creativity, patience, and problem-solving in a way that no lesson or lecture can replicate. The focused, calm nature of craft time has a meditative quality for adults too – it’s hard to scroll your phone when you’re curling tentacles.
Studies consistently show that creative activity – even simple crafting – reduces cortisol levels and supports emotional regulation in children and adults alike. So yes, making a paper octopus is technically a wellness activity. You’re welcome.
And when your child holds up their finished octopus and beams with pride? That feeling is genuinely priceless.

Make It a Party Activity
This craft absolutely shines as a party activity – especially for ocean-themed, mermaid, or under-the-sea parties. Set up a craft station with pre-cut paper in multiple colors, markers, googly eyes, and glitter glue, and let the kids go wild.
Each child goes home with a one-of-a-kind creation they made themselves. No party favor bag needed – their octopus IS the favor. Parents will be impressed, kids will be proud, and you’ll look like the most creative host on the block.
For a really special touch, set up a little “photo station” with a blue paper backdrop and some craft sea creatures. Kids can pose with their finished octopus for a photo memory that’s way more fun than a standard group shot.
You’ve Got This, Mama
Whether you’re a craft veteran or you genuinely thought this was going to be complicated – look at you now. You’ve got the full roadmap, a supply list that costs almost nothing, and a finished octopus that’s going to make everyone smile.
The most important ingredient in any craft isn’t the cardstock or the scissors. It’s the time you choose to spend doing something joyful and creative with the people you love most.
Now go make some octopuses. Make a lot of them. Make a whole undersea world.
And when your kid looks up with glue on their fingers and the biggest grin on their face – that’s the moment. That’s what this is all for.
Happy crafting! 🐙
More Summer Craft & Activity Ideas to Keep the Fun Rolling:
How to Make Adorable Fruit Paper Fan Crafts Kids Will Absolutely Love
Plastic Spoon Bug Craft: The Cutest Ladybug and Bumblebee You’ll Make in Under 30 Minutes
Ice Cream Cone Name Craft (Printable Template!)
How to Make the Cutest Beaded Pipe Cleaner Dragonflies (Kids Will Absolutely Love This!)
Easy Paper Bowl Jellyfish Craft Kids Will Absolutely Love (No Paint Needed!)
